Whether you’ve been using Windows 10 for awhile now, or you’ve just recently upgrade, there are still plenty of tips and tricks to learn about Windows 10! Windows 11 will require a lot more hardware specifications, including the main one: a 64-Bit Processor.
With That Being Said, Let’s Ensure You Are Maximizing Windows 10:
1. Personalize the Start Menu
The first thing you probably noticed with Windows 10 was the colorful and vibrant Start menu.
What once was a button on the bottom of your screen has grown to become a full-screen experience with live “tiles” that show images and even advertisements.
But did you know that you can customize it?
Hit the Windows icon at the bottom of your screen and go to Start > Settings > Personalization > Start, to customize the look of your new environment.
You can choose which system folders you want to see on the left hand side, show recently added apps, rearrange and resize the tiles, and much more. Here’s a good article that can give you all the nitty gritty details on customizing the Windows Start menu!
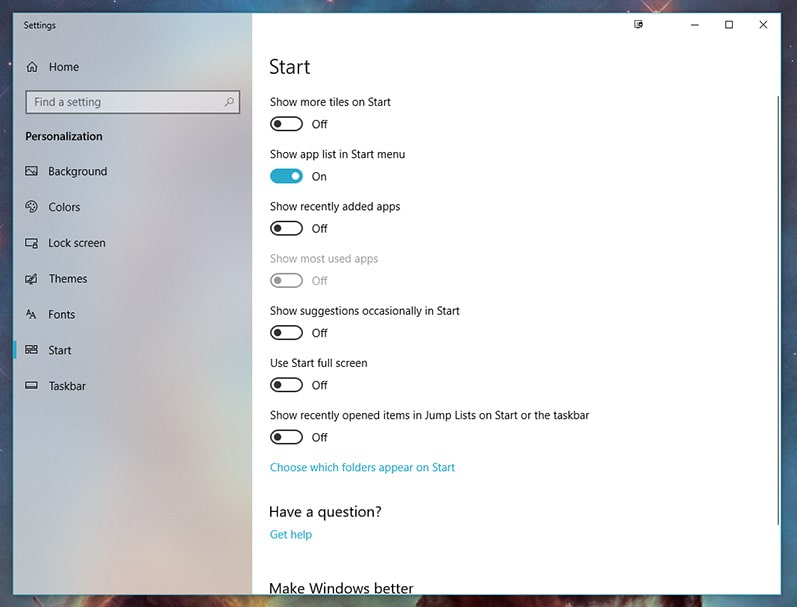
Don’t like the new Start menu?
If you prefer the old menu, simply head in to Start > Settings > Personalization > Start, and turn off every button, except “Show app list in Start menu”, as shown below.
This will bring back the more familiar menu!
2. Search In Windows 10 Quickly and EasilyThe search feature in Windows 10 is absolutely the most useful tool on the entire OS. No longer just meant to help you find a misplaced file, the search is integrated into systems menus as well.
Click the search icon at the bottom left of your screen to get started. By default, the search window shows the top apps you use, as well as recent activities, so you can easily click on the programs and files you use most.
Simply start typing in the taskbar at the bottom of the search window, and Windows will get you what you need.
If you want to quickly narrow down the search by category, choose one of the 3 icons that appear on the top left of the window, as seen below.
From left to right, you can guide Windows to only search in Apps, Documents or the Web.
.png?width=786&name=Windows%20Ten%20Hidden%20Tips%20and%20Tricks%20(2021).png)
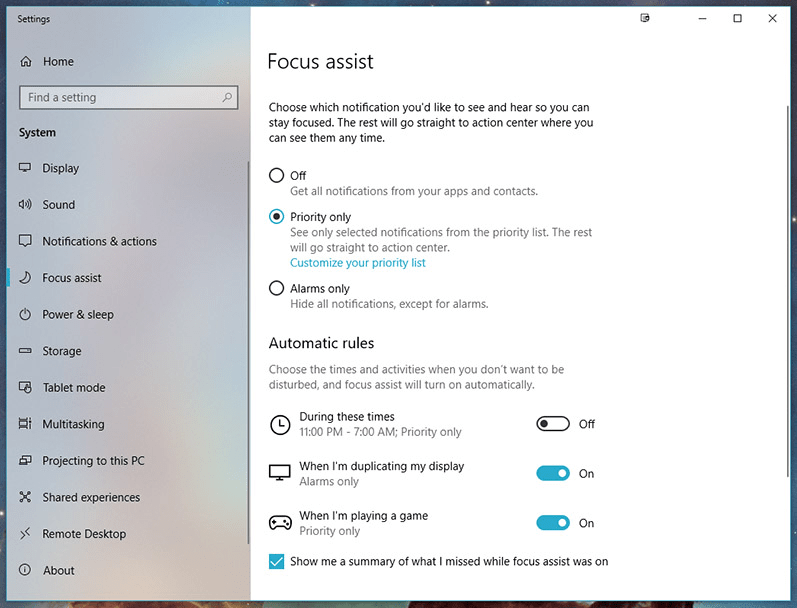
3. Use Focus Assist to Keep You On-Task
We’re always being interrupted from our work. Notifications pop up at random intervals to pull our attention away from what we really need to be doing.
Focus Assist is here to keep you on track. Flick a switch and you’ll banish notifications, alerts and more from pestering you when you need to stay on track.
You can find Focus Assist under Settings > System > Focus Assist.
The no-interruption software can be configured to turn on automatically during certain hours, or you can turn it on manually when you’re presenting or sharing your screen, to prevent what sometimes can be embarrassing notifications that might pop up!
You can also customize the priority of your notifications.
Some contacts will need to get through no matter what you’re focusing on. We’ve talked about the importance of configuring VIPs on your phone, and you can do something similar for your PC.
Under Focus Assist settings, select “Priority Only.” Beneath this option, you’ll see “Customize your priority list,” where you can select the important people and even applications you want to receive immediate alerts from.
Everything else will be pushed aside so you can stay focused on your tasks at hand.
Don’t worry, your action center will show you a summary of what you missed while Focus Assist was enabled whenever you’re ready to let your mind wander.
Keep those distractions under control!
4. Use Multiple Virtual Desktops To Manage Projects
If you only have a single monitor, having multiple virtual desktops is a very handy feature!
Even if you have multiple monitors, juggling a whole bunch of different projects on the same computer can be a challenge.
The Task View pane in Windows 10 allows you to add an unlimited number of virtual desktops quickly and easily. You can manage the view of your virtual desktop, and move applications to different desktops, show windows on all desktops or close pages on a selected desktop.
To add a virtual desktop, open up the new Task View pane by clicking the Task View button (two overlapping rectangles) on the taskbar at the bottom of your screen, or by pressing the Windows Key + Tab.
You’ll see all your currently open tasks that you are working on, but look up the top right of your screen and you’ll see + New Desktop. Click on + New Desktop to add your new “virtual desktop.”
To switch between virtual desktops, open the Task View pane and click on the desktop you want to switch to. You can also quickly switch desktops without going into the Task View pane by using the keyboard shortcuts Windows Key + Ctrl + Left Arrow and Windows Key + Ctrl + Right Arrow.
Now you can quickly move from desktop to desktop to find all of your different projects and associated tasks!
5. Have You Heard of the Cloud Clipboard?
Here’s another feature that very few people take advantage of. It’s called Cloud Clipboard, and it let’s you seamlessly copy and paste text, links, and pictures across multiple devices.
To bring up the cloud clipboard menu, hit the Windows key + V.
This will cause the cloud clipboard to appear, showing the content previously clipped and copied – including text, HTML and images less than 1MB in size.
Copied text in this clipboard history can also be shared across all devices that are signed into the same Microsoft account, providing that text is less than 100kb in size.
To select a piece of content from the clipboard history, left click on it. Then, select paste from the dropdown menu or hit Ctrl + V and you can paste that selected content wherever you want.
6. Take Advantage of Dark Mode and Night Light
Do you work late at night or early in the morning? A too-bright monitor can cause headaches and eye strain.
- Dark Mode – Under Settings > Personalization > Color, you can select “dark” as the default Windows and/or app mode. This turns your bright white screen a little darker, making most of your Windows apps and features show white text against a black or gray background. You can play around with using this at different times of the day, to see what works for you.
- Night Light – Now that we’re all on video calls such as Zoom for most of the day, you may notice that when sitting straight in front of your huge monitor, all that white light shining on your face makes you look over-exposed. Just go to Settings > System > Display and turn on “Night Light”. Night Light, a “blue light filter”, is intended to make your display use warmer colors at night to help you sleep better and reduce eyestrain – but turning it on throughout the day will help you look A LOT better on those incessant video calls!

7. Securing Your Windows 10 Machine
We would be remiss if we didn’t include include basic security tips for Windows 10.
Here are just a few tips that every user should know, but keep in mind cyber security protection has become much more complex and goes far beyond making sure your individual PC has the right settings turned on.
Always consult with a qualified cyber security consultant like Dr. Sky Houston or Mr. John Davin to learn how to properly protect your business or home office right now (702) 246-2908 or Help@GeeksByTheHour.com!
- Keep Windows up to date. By default, Windows updates automatically. That means you might occasionally get an update you don’t want and can’t prevent. But generally, you’ll want your updates right away – some updates are urgent security fixes.
- Set a log-in password if you haven’t already. Many people don’t bother to establish a log-in password when they set up Windows. But without one, your computer is vulnerable to anyone! Go to Settings > Accounts > Sign-In Options and under Password, click Add.
- Make sure your security software is running and up to date. Windows 10 comes with basic malware protection, but we recommend additional measures. Please contact a knowledgeable IT security expert who can help ensure you are well protected!
- Keep applications updated and uninstall software you never use. The smaller your attack surface, the safer you are. Shrink it by uninstalling applications you’ll never use. That might be bloatware which came with your computer, takes up space, and potentially risks your safety and privacy. If you don’t use it, delete it.
- Consider encryption. If someone steals your logged-on computer or remotely accesses your files, they can steal valuable data. Consider encrypting it. Windows 10 Professional, Enterprise, and Education versions come with BitLocker, which can encrypt your built-in or portable drives. Again, if you’re not comfortable configuring these types of security settings, consult an expert.
- Use a VPN on the road. Mobile Wi-Fi hotspots can be unsafe. If you’re doing anything important, use a VPN that encrypts everything you send and receive. Your employer likely already provides one, but if you are like the great majority of us post-Pandemic working from home today, there are lots of options to set up your own VPN.
If you need additional help on Windows, Microsoft 365 or any other IT needs, reach out to us to learn how we can help your organization use technology to optimize your business and most importantly, stay secure.