New Password Reset attack targets Apple device users

Apple iPhone Users Targeted As Increased Password Reset Scams Skyrocket In 2024

New password reset attack targets Apple device users

Scammers are taking advantage of Apple’s password reset tool in a new ‘MFA bombing’ attack.
woman using phone in the dark
d3sign/Getty Images

Apple device owners are facing a new phishing hack that uses “multi-factor authentication (MFA) bombing” to steal their data.

Several Apple users in have reported a hacking attempt that appears to take advantage of Apple’s password reset feature, KrebsOnSecurity reported, citing people who have been targeted. The scammers have used Apple’s password reset tool to spam their targets with dozens, if not hundreds, of notifications, asking the user to reset their Apple ID password.

Pressing the “Allow” option gets the scammers one step closer to resetting the user’s credentials because that device could then be used to create a new Apple ID password.

Unfortunately, tapping “Don’t Allow” on all the notifications doesn’t solve the problem.

After those targeted by the scam chose to not allow their passwords to be reset, they received phone calls from the scammers claiming they were from Apple’s support team, according to the report. Their goal was to send a password reset code to the user’s device and have the user tell them the code. Armed with that information, the scammers could simply reset the Apple ID password and get full access to the user’s account.

Since Krebs’ sources didn’t press “Allow” on the notification, it’s unclear what the scammers would have done in that scenario. Presumably, the scammers would still likely need to call the target, again acting as Apple support, and fool them into resetting the password on their device and sharing it with the hacker.

Phishing attacks have been used for decades to target unsuspecting victims. But in recent years, scammers have increasingly turned to phishing as a desirable way to steal passwords, delete data, and ultimately steal money from their victims.

In 2022, mobile phishing attacks were up a whopping 61% year-over-year in just a six-month period, according to security provider SlashNext. The company said mobile users faced 255 million phishing attacks during that period.

It’s unclear how many Apple users have been impacted by this MFA bombing attack. However, Krebs’ sources reported that they received notifications on their iPhones, Apple Watches, and Macs, suggesting the attack isn’t just limited to one type of Apple device. What’s worse, there’s no simple way to stop it.

One of Krebs’ sources said they called Apple for help with the attack and the company said they should create a recovery key, a 28-character code that they would need to input to change their Apple ID password.

However, after creating a recovery code, Krebs reported that it was still possible to trigger the notifications the users saw when targeted by the spammers. It appears Apple’s password reset feature may be to blame and until the company changes how that works, hackers could conceivably continue to exploit the flaw and target users.

For now, if you’re an Apple user, your only option is to stay in the know and remain vigilant. If you receive a slew of password reset requests that you didn’t initiate, be sure to always choose the “Don’t Allow” option on the notifications.

Don’t be tempted to choose “Allow” simply because the notifications aren’t allowing you to use other apps or services on your device — a core component in the fraudsters’ plan. Even if you don’t choose “Allow,” be prepared for a call and be sure not to answer it.

Additionally, Apple has made it clear that the company does not call any of its users directly. So, if you receive a number from 1-800-275-2273 (Apple’s actual support line that the scammers are spoofing to make their calls seem legitimate), don’t pick up and definitely don’t provide any information to the caller.

featured


How to Hide Your IP Address and Change Location on Coinbase

Are you concerned about your online privacy and looking for ways to mask your IP address on Coinbase?

If like many people, you have come to the right place. In this guide, we’ll walk you through the steps to change your location on Coinbase (or any other Crypto Exchange) and hide personal information like your IP address, country, and region.


Quick Guide: Hide Your IP Address and Change Your Location

  • Mask Your IP Address
  • Flush DNS and Renew Your IP Address
  • Change Your Coinbase Location Settings
  • Other Methods to Hide Your IP Address and Location on Coinbase

Why Hide Your IP Address?

There are several reasons why you might want to hide your IP address. One of the main reasons is to protect your privacy and prevent Coinbase from tracking your physical location. By masking your IP address, you can also avoid leaving a digital footprint and bypass content filters or bans.

How to Hide Your IP Address and Location from Coinbase

  1. Mask Your IP Address
    • Use a VPN (Virtual Private Network) or proxy server to mask your IP address and spoof your location.
    • We recommend using NordVPN for its ease of use and reliability.
    • Follow these steps to install and configure NordVPN:
      1. Visit NordVPN’s website and create an account.
      2. Download and install NordVPN on your devices.
      3. Connect to a VPN server from your preferred location.
  2. Flush DNS and Renew Your IP Address
    • Clear your DNS cache to ensure your computer obtains the latest IP address from Coinbase’s DNS server.
    • Renew your IP address through your device’s settings or command prompt.
    • Follow these steps for PC (Any Windows OS Computer) (please contact me directly at https://www.t.me/DigitalFoundation for one on one Consultation):

Step-by-Step Guide: Flush DNS and Renew Your IP Address

Step 1: Open Command Prompt

      • On Windows: Press the Windows key, type “cmd” in the search bar, then press Enter.
      • On Mac: Open Spotlight (Command + Space), type “Terminal,” then press Enter.

Step 2: Run Command Prompt as Administrator

      • Right-click on Command Prompt in the search results.
      • Select “Run as administrator” from the context menu.

Step 3: Enter Commands

      • In the Command Prompt window, type the following commands one by one, pressing Enter after each:
        • ipconfig /flushdns (This command clears the DNS resolver cache.)
        • ipconfig /release (This command releases your current IP address.)
        • ipconfig /renew (This command requests a new IP address from your DHCP server.)

Step 4: Confirm Success

      • Look for confirmation messages after each command.
      • You should see messages indicating successful flushing of the DNS resolver cache and renewal of your IP address.

Step 5: Close Command Prompt

      • Once you’ve completed the commands and confirmed success, you can close the Command Prompt window.

Note:

      • Flushing the DNS resolver cache and renewing your IP address can help resolve network connectivity issues and ensure that your computer has the latest IP address information.
      • These steps may vary slightly depending on your operating system. Always run Command Prompt with administrator privileges for these actions.

Mac/Apple Flushing DNS:


  1. Change Your Coinbase Location Settings
    • Before logging in to your Coinbase account, ensure NordVPN is running and connected to the preferred server location.
    • Log in to your account, go to “Privacy Settings,” and change your “Location/Region/Country” to match your VPN server.
    • Save the changes and you’re all set.

Can’t Change Your Coinbase Location Settings? Here’s What to Do

If you’re unable to change your region, location, or country on Coinbase’s account settings, you can contact Coinbase support for assistance. Follow these steps:

  • Connect to NordVPN and your preferred server.
  • Find the “Contact Us” or “Get in touch” page on Coinbase’s website here: https://help.coinbase.com/en-gb
  • Send a message to Coinbase support requesting a manual update of your physical location.
  • Wait for 24-48 hours for their response.

Other Methods to Hide Your IP Address and Location on Coinbase

In addition to using a VPN or proxy server, you can also consider using a neighbor or trusted friend’s Wi-Fi networks or proxy servers. However, keep in mind the security and privacy implications of these methods. If you are unsure or don’t know whether or not your Internet/Device/Computer is truly SECURE, take 2 minutes of your valuable time and go here to run a VPN and Browser Leak Scan: https://browserleaks.com/webrtc


VPN vs. Proxy vs. Public Wi-Fi: A Comparison

Here’s a comparison table outlining the key differences between using a VPN, proxy server, and public Wi-Fi to hide your IP address and change your location on Coinbase:


Features/Attributes VPN Proxy Server Public Wi-Fi
IP Address Masking Yes Yes Yes
Encryption Yes (High-level) No No
Geolocation Spoofing Yes Yes Partial
Ease of Setup Easy Moderate Easy
Speed Fast (depends on service) Moderate Varies (often slow)
Security High Low Very Low
Privacy High Low to Moderate Very Low
Access to Restricted Content Yes Yes Maybe
Consistency High Moderate Low
Cost Subscription Subscription or one-time fee Free
Legality & Compliance Generally Legal, some restrictions apply Generally Legal, some restrictions apply Legal

In summary, using a VPN offers the highest level of security and privacy, while proxy servers and public Wi-Fi networks may be less reliable. Choose the method that best suits your needs and always prioritize your online privacy and security.

By following these steps and tips, you can effectively hide your IP address and change your location on Coinbase, ensuring your online activities remain private and secure.

Disclaimer:

The information provided in this blog post is for educational purposes only. While we strive to provide accurate and up-to-date information, we cannot guarantee the effectiveness or suitability of the methods described.

By following the steps outlined in this guide, you acknowledge that neither any individuals affiliated with GeeksByTheHour nor its affiliates are responsible for any actions, events, or consequences that may occur as a result.

It is recommended to consult with a qualified IT professional or technician before performing any network-related actions on your computer. Always proceed with caution and at your own risk.

Apple Macintosh Turns 40!

The Apple Macintosh was the first successful mass-market PC designed with elegance and aesthetics in mind. On Wednesday, January 24, 2024 it turns 40.

A young Steve Jobs, left, with Apple co-founder Steve Wozniak

  • On Wednesday, January 24, 2024 Apple Macintosh turns 40.
  • Born in 1984, the year in which George Orwell’s dystopian novel is set, the Macintosh represented a breakaway from the bland grey of corporate computing power that IBM embodied.

From the perspective of Apple co-founder Steve Jobs, IBM was a representation of Orwell’s power-hungry “Big Brother”.
“It appears IBM wants it all. Apple is considered the only force that can give IBM a run for it’s money. Will Big Blue dominate the entire computer industry? The entire information age? Was George Orwell right?” Jobs said at the Macintosh launch. (Big Blue was a term commonly used at the time to refer to IBM, which at the time was the computer industry’s biggest company – by far.)

          Mac Creativity At Its Finest: 1984 Commercial

The original Mac featured an 8MHz Motorola 68000 processor, 64KB of RAM and a 400KB floppy disk drive.
And just like that, the Macintosh (shortened to just “Mac” after 1999) had arrived – and the computer industry would never be the same again.

Although competitive from a technical point of view – featuring an 8MHz Motorola 68000 processor, 64KB of RAM and a 400KB floppy disk drive – what set the Macintosh apart from rivals – including the then-newly launched IBM PC, the Commodore and the Tandy – was the humanist ethos reflected in its design. The Macintosh was beautiful to look at and, unlike the PC with its command-line interface (DOS), easy to use.

GUI and Mouse
Typical of his obsessive and unwavering personality, Jobs had insisted that the Macintosh use a graphical user interface (GUI) and a mouse, features carried over from the Lisa – an expensive and unpopular computer Apple had released a year earlier – that have defined the standard PC interface ever since.

The GUI could also display text in a variety of fonts, sizes and variants – another feature Jobs insisted on, this one influenced by a calligraphy course he took before dropping out of college.“It was the first computer with beautiful typography,” Jobs later said at his iconic Standford commencement address. “If I had never dropped in on that single course in college, the Mac would have never had multiple typefaces or proportionally spaced fonts. And since Windows just copied the Mac, it’s likely that no personal computer would have them.”

No Slowing Down Today In 2024 And Beyond For Mac
Another iconic Mac from the 1990s – the iMac G3 – was sold from 1998 to 2003 and is considered to be one of the most gorgeous computers ever made. The G3 was the first product released after Jobs’s return to Apple following an 11-year hiatus and signaled a renaissance at the company.

The Mac would go through another chip overhaul when Apple switched to Intel chips in 2006. That same year, Apple introduced the first MacBook Pro, which featured a sleek aluminum design and Intel Xeon processors, making it a popular choice for professionals. The MacBook Air followed in 2008 and was the thinnest laptop in the world at the time, weighing only 1.36kg and measuring 1.93cm at its thickest point.

In 2012, Apple launched the MacBook Pro with Retina Display, which had a high-resolution display and a slim design.

The 2015 MacBook Pro represented the end of an era in terms of connectivity and aesthetics. Later generations would do away with the full-sized SD card slot, HDMI, USB-A and MagSafe magnetic power ports in favor of a sleeker design. It was also the last MacBook to feature an Apple logo that glowed when the machine was powered up.

Happy 2024 Everyone and realize that even after 40 years, the Mac is still going strong, supported by a loyal and growing army of fans. The Mac – in all its guises – is today slimmer, smarter and faster than ever. Apple Silicon and a great design ethos is keeping Jobs’s original design philosophy alive.

The pricing, however, may not be as well aligned to “the PC for everyone else” that Jobs intended the original Mac to be compared to non-Mac PC’s at least for today – but it keeps the handsome profits at Jobs-like levels for sure!

Dr. Sky, GeeksByTheHour.com – © 2024

Does your iPhone or iPad have Pegasus spyware? Find out for FREE right now!

Does your iPhone or iPad have Pegasus spyware? Find out for FREE right now (only a 5 minute read)

If you are like me, you’re curious about whether your iPhone or iPad is infected by Pegasus spyware. Here’s how to check for peace of mind.

 cybersecurity-2544
You will need to connect your iPhone to your computer to check for Pegasus spyware. 

Every time there’s a report about an iPhone or iPad exploit being actively distributed and used, it’s unnerving. In July, 2021 it was revealed that security researchers discovered evidence of Pegasus spyware being used on the phones of journalists, politicians and activists without their knowledge or, just as importantly, without their consent.

The spyware can be remotely installed on a target’s iPhone or iPad without the owner taking any action, granting the person or organization who installed it full access to the device and all the data it holds. That includes text messages, emails and even recording phone calls. Pegasus was originally designed and is marketed by its creator, the NSO Group, to monitor criminals and terrorists.

To be clear, the odds of your iPhone or iPad being infected by the Pegasus Spyware are low, and various reports claim that the most recent update, iOS 14.7.1, fixed the exploit Pegasus was using, but that hasn’t been confirmed by Apple. That said, if you want peace of mind — just in case — by knowing that your device is free of anyone spying on you, here’s what you need to do.

iMazing recently updated its Mac and PC app to include Amnesty International’s Mobile Verification Toolkit (MVT) which was built to detect signs of Pegasus on a device and isn’t charging users to access the feature.

Download iMazing for your respective computer from the company’s website. Don’t worry about buying the app, we can run the full spyware test using the free trial. 

After it’s downloaded, install iMazing and then open it. When prompted, select free trial.

how-to-run-imazing-spyware-tool
The longest part is waiting for the app to make a back up of your iPhone or iPad. 

How to run the Pegasus Spyware test on your iPhone or iPad

With iMazing installed and running, connect your iPhone or iPad to your computer using the appropriate cable. You may have to enter your Lock Screen code on your device to approve the connection before proceeding (something to keep in mind if your iPhone or iPad isn’t showing up in iMazing).

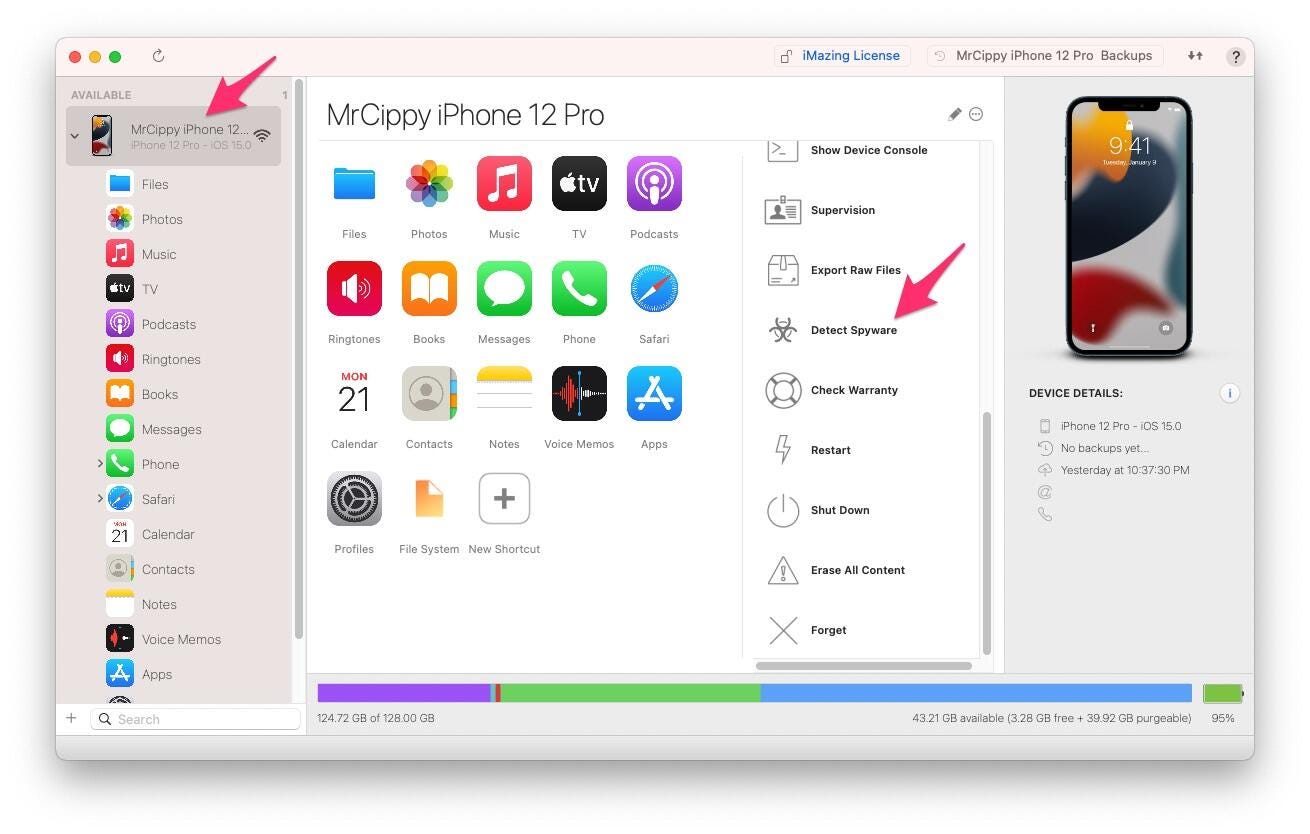
Next, scroll down through the action options on the right-hand side of iMazing until you locate Detect Spyware; click on it.

A new window will open, guiding you through the process. The tool works by creating a local backup of your device (so you’ll need to make sure you have enough storage space for the backup), and then analyzing that backup. It’s an automated task, so you don’t have to stick around to monitor it once you click start.

iMazing suggests leaving all of the default settings in place as you click through each screen. There are configuration options built into the tool for advanced users, but for most of us (including myself), the default configuration settings will get the job done. 

After going through the basic configuration, you’ll need to accept a license for the tool and then click the Start Analysis button.

Once the process starts, make sure you leave your iPhone or iPad connected until it’s finished. I ran the test on my iPhone 12 Pro and it took around 30 minutes to create the backup and another 5 minutes for it to be analyzed. After the backup was created, I did have to enter my account password to allow iMazing to begin analyzing the file. Because of that, I recommend starting the tool and checking on it after a while. My neighbor has a iPhone 12 (not a Pro model) and the same process took her 45 minutes and another 13 minutes respectively to give you a comparison of iPhone devices.

Once iMazing begins analyzing your device’s backup, it’ll show you its progress by displaying each individual app it’s checking, starting with iMessage. The app is using a database of known “malicious email addresses, links, process names and file names

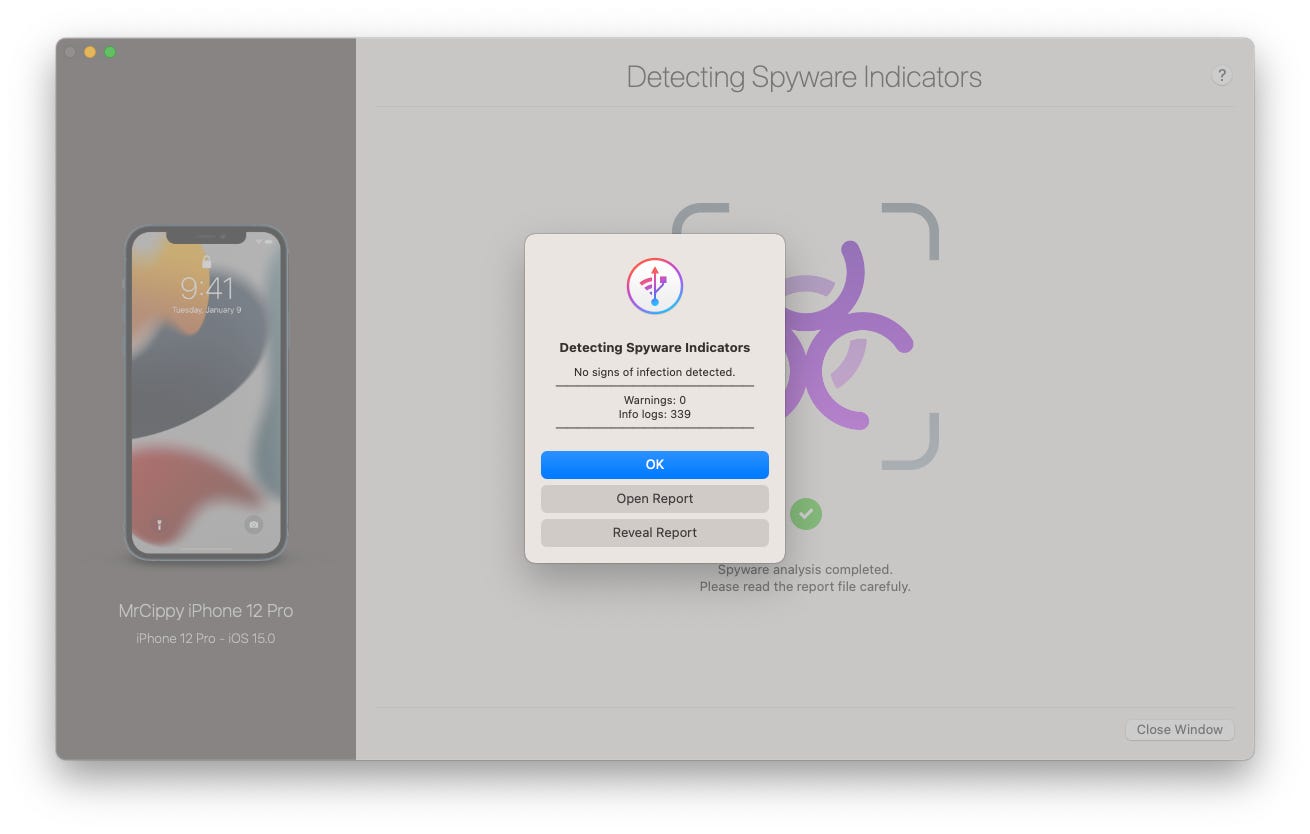
When iMazing finishes, you’ll see an alert with the results. In my case, my iPhone 12 Pro did not show any signs of infection and had 0 warnings.

The alert also includes two buttons to either open or reveal the report. I looked through my report and it contained a bunch of random links that meant nothing to me.

imazing-spyware-check-results.png
At the end of the scan, the results are displayed in an easy to read alert.

What to do if the iMazing app says your device has signs of an infection

First of all, don’t panic. It could be a false positive. iMazing asks that you send the report (click reveal report to go directly to the file) to its customer support team who will then do further analysis.

The company does suggest, however, that if you or a family member are active in a “politically sensitive context” and have a positive report to immediately remove your SIM card and turn your iPhone off.

Again, the odds of getting a true positive report are very low, but at least you’ll have some peace of mind. For more peace of mind and a free 30-minute security diagnosis by Certified Mac/Apple Technicians, contact GeeksByTheHour.com right now.