How to Hide Your IP Address and Change Location on Coinbase

Are you concerned about your online privacy and looking for ways to mask your IP address on Coinbase?

If like many people, you have come to the right place. In this guide, we’ll walk you through the steps to change your location on Coinbase (or any other Crypto Exchange) and hide personal information like your IP address, country, and region.


Quick Guide: Hide Your IP Address and Change Your Location

  • Mask Your IP Address
  • Flush DNS and Renew Your IP Address
  • Change Your Coinbase Location Settings
  • Other Methods to Hide Your IP Address and Location on Coinbase

Why Hide Your IP Address?

There are several reasons why you might want to hide your IP address. One of the main reasons is to protect your privacy and prevent Coinbase from tracking your physical location. By masking your IP address, you can also avoid leaving a digital footprint and bypass content filters or bans.

How to Hide Your IP Address and Location from Coinbase

  1. Mask Your IP Address
    • Use a VPN (Virtual Private Network) or proxy server to mask your IP address and spoof your location.
    • We recommend using NordVPN for its ease of use and reliability.
    • Follow these steps to install and configure NordVPN:
      1. Visit NordVPN’s website and create an account.
      2. Download and install NordVPN on your devices.
      3. Connect to a VPN server from your preferred location.
  2. Flush DNS and Renew Your IP Address
    • Clear your DNS cache to ensure your computer obtains the latest IP address from Coinbase’s DNS server.
    • Renew your IP address through your device’s settings or command prompt.
    • Follow these steps for PC (Any Windows OS Computer) (please contact me directly at https://www.t.me/DigitalFoundation for one on one Consultation):

Step-by-Step Guide: Flush DNS and Renew Your IP Address

Step 1: Open Command Prompt

      • On Windows: Press the Windows key, type “cmd” in the search bar, then press Enter.
      • On Mac: Open Spotlight (Command + Space), type “Terminal,” then press Enter.

Step 2: Run Command Prompt as Administrator

      • Right-click on Command Prompt in the search results.
      • Select “Run as administrator” from the context menu.

Step 3: Enter Commands

      • In the Command Prompt window, type the following commands one by one, pressing Enter after each:
        • ipconfig /flushdns (This command clears the DNS resolver cache.)
        • ipconfig /release (This command releases your current IP address.)
        • ipconfig /renew (This command requests a new IP address from your DHCP server.)

Step 4: Confirm Success

      • Look for confirmation messages after each command.
      • You should see messages indicating successful flushing of the DNS resolver cache and renewal of your IP address.

Step 5: Close Command Prompt

      • Once you’ve completed the commands and confirmed success, you can close the Command Prompt window.

Note:

      • Flushing the DNS resolver cache and renewing your IP address can help resolve network connectivity issues and ensure that your computer has the latest IP address information.
      • These steps may vary slightly depending on your operating system. Always run Command Prompt with administrator privileges for these actions.

Mac/Apple Flushing DNS:


  1. Change Your Coinbase Location Settings
    • Before logging in to your Coinbase account, ensure NordVPN is running and connected to the preferred server location.
    • Log in to your account, go to “Privacy Settings,” and change your “Location/Region/Country” to match your VPN server.
    • Save the changes and you’re all set.

Can’t Change Your Coinbase Location Settings? Here’s What to Do

If you’re unable to change your region, location, or country on Coinbase’s account settings, you can contact Coinbase support for assistance. Follow these steps:

  • Connect to NordVPN and your preferred server.
  • Find the “Contact Us” or “Get in touch” page on Coinbase’s website here: https://help.coinbase.com/en-gb
  • Send a message to Coinbase support requesting a manual update of your physical location.
  • Wait for 24-48 hours for their response.

Other Methods to Hide Your IP Address and Location on Coinbase

In addition to using a VPN or proxy server, you can also consider using a neighbor or trusted friend’s Wi-Fi networks or proxy servers. However, keep in mind the security and privacy implications of these methods. If you are unsure or don’t know whether or not your Internet/Device/Computer is truly SECURE, take 2 minutes of your valuable time and go here to run a VPN and Browser Leak Scan: https://browserleaks.com/webrtc


VPN vs. Proxy vs. Public Wi-Fi: A Comparison

Here’s a comparison table outlining the key differences between using a VPN, proxy server, and public Wi-Fi to hide your IP address and change your location on Coinbase:


Features/Attributes VPN Proxy Server Public Wi-Fi
IP Address Masking Yes Yes Yes
Encryption Yes (High-level) No No
Geolocation Spoofing Yes Yes Partial
Ease of Setup Easy Moderate Easy
Speed Fast (depends on service) Moderate Varies (often slow)
Security High Low Very Low
Privacy High Low to Moderate Very Low
Access to Restricted Content Yes Yes Maybe
Consistency High Moderate Low
Cost Subscription Subscription or one-time fee Free
Legality & Compliance Generally Legal, some restrictions apply Generally Legal, some restrictions apply Legal

In summary, using a VPN offers the highest level of security and privacy, while proxy servers and public Wi-Fi networks may be less reliable. Choose the method that best suits your needs and always prioritize your online privacy and security.

By following these steps and tips, you can effectively hide your IP address and change your location on Coinbase, ensuring your online activities remain private and secure.

Disclaimer:

The information provided in this blog post is for educational purposes only. While we strive to provide accurate and up-to-date information, we cannot guarantee the effectiveness or suitability of the methods described.

By following the steps outlined in this guide, you acknowledge that neither any individuals affiliated with GeeksByTheHour nor its affiliates are responsible for any actions, events, or consequences that may occur as a result.

It is recommended to consult with a qualified IT professional or technician before performing any network-related actions on your computer. Always proceed with caution and at your own risk.

DMARC: What Is It & Why Is February 1, 2024 Important?

DMARC

For 2024, Google and Yahoo are rolling out updated guidelines for bulk email senders, aimed at boosting deliverability and fighting the good fight against spam. This is good news: not only will it positively impact your deliverability, it’s easy to implement.

Why the update?

It’s simple: to create a cleaner, more secure environment for both senders and recipients. The new requirements fall into three key categories:

  • Authentication: Email authentication verifies you’re a legitimate sender, not a spammer. If you’re sending emails already, you’ve probably already taken the first step by setting up SPF (sender policy framework) and DKIM (domainkeys identified mail) records, even if you weren’t sure what they did. Now, the next crucial step is publishing a DMARC policy.

  • Simple unsubscribes: No more requiring users to authenticate or navigate labyrinthine unsubscribe processes. One-click unsubscribe provides a better user experience. Luckily, if you’ve already been offering this option, you’re already ahead of the curve!

  • Spam complaints: If you’re diligently collecting opt-ins with proper consent, spam complaints likely won’t be a concern. But it’s always good practice to maintain a healthy email list and engage your audience thoughtfully.

So what is DMARC?

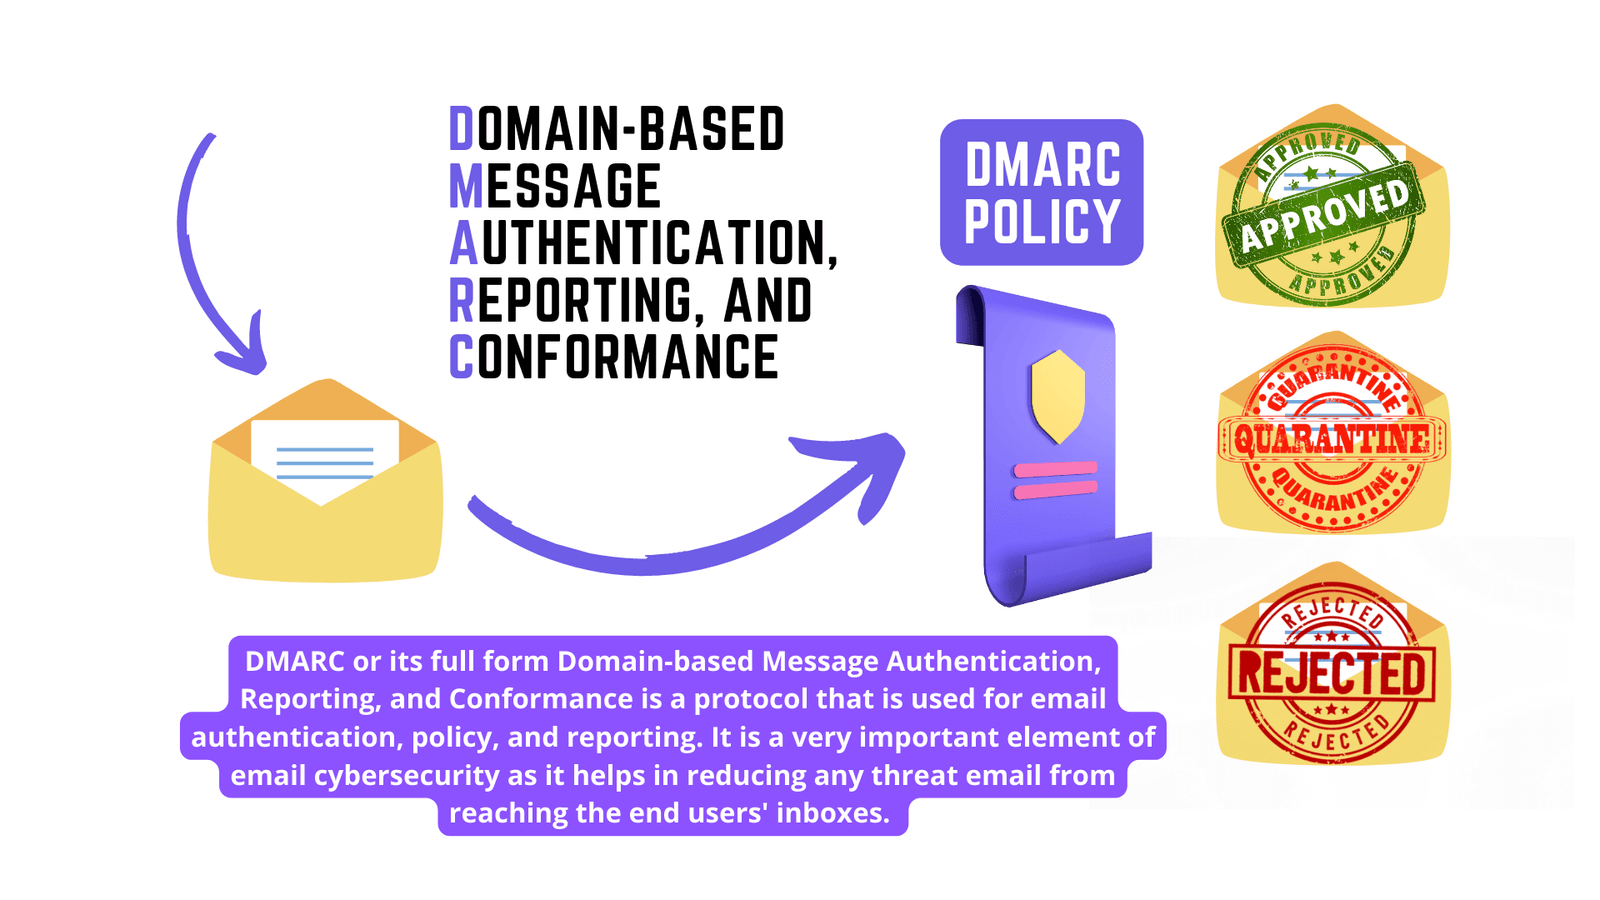
  • The DMARC policy (Domain-based Message Authentication, Reporting & Conformance) acts as your email’s official security document, telling the world how to handle messages claiming to be from your domain.
  • Setting it up properly is essential today because many Email List Providers (such as small businesses) are already being surprised that their E-Mail Success % Rates Are Decreasing Just This Week (Google and Yahoo Domain Emails Began Enforcement On February 2nd, 2024).By February 1, 2024, publish your DMARC policy with your domain provider. Ensure this TXT record is added to your DNS settings with “yourdomain.com” replaced with your actual company domain:

    Hostname: _dmarc.yourdomain.com          Value: v=DMARC1; p=none;

    It is actually straight-forward for most technical savvy folks whether you manage DNS yourself or need to put in a ticket so that your IT team can handle the DNS settings. (You can learn even more about DMARC records, including other options like adding a “rua” value to designate an email address that will receive DMARC reports, in Google’s documentation here.

    These new email requirements might seem like extra hurdles, but they’re ultimately a positive step towards a more reliable and enjoyable email experience for everyone. By taking the small steps outlined above, you can ensure your business thrives under the new rules, reaching your target audience effectively and building lasting relationships.
    TECHNICAL DETAILS ABOUT DMARC IF YOU WANT TO DIVE DEEPER:

  1. Domain-Based Message Authentication, Reporting and Conformance (DMARC) is an email authentication policy that protects against bad actors using fake email addresses disguised to look like legitimate emails from trusted sources.
  2. DMARC makes it easier for email senders and receivers to determine whether or not an email legitimately originated from the identified sender. Further, DMARC provides the user with instructions for handling the email if it is fraudulent.
  3. WHY SHOULD ORGANIZATIONS LIKE YOURS BE INTERESTED IN DMARC?
    Phishing and Spearphishing are among the top attack vectors for any organization dealing with PII (Personal Identifying Information), which can lead to identity impact, financial fraud, or even protected health information (PHI) breaches and Health Insurance Portability and Accountability Act (HIPAA) fines --> why? Because many individuals in the "black market" underground will access, buy, and sell that PII for non-Citizens/those who do not have health insurance-->they will be using it for their own "services" with fake ID presented as the same name and person that your company revealed their PII.                  
                    
    Summary: Your/Your Company liability can be far more reaching than you could ever imagine. It happens every day in the United States where "Joe" walks up to the urgent care or hospital needing emergency care with someone else's ID/SSN/healthcare insurance information all for the right price!
  4. Fraudulent emails are easy to design and cheap to send, which gives threat actors incentive to use repeated email attacks. DMARC provides an automated approach to reducing fraudulent email, before it ever reaches an employee’s inbox. In addition, DMARC helps prevent adversaries sending email to your organization or others purportedly from your staff.
  5. HOW DOES DMARC WORK? 
    DMARC removes guesswork from the receiver’s handling of emails from non-authoritative email servers, reducing the user’s exposure to potentially fraudulent and harmful messages. A DMARC policy allows a sender to indicate that their emails are protected by Sender Policy Framework (SPF) and/or Domain Keys Identified Message (DKIM), both of which are industry-recognized email authentication techniques. DMARC also provides instructions on how the receiver should handle emails that fail to pass SPF or DKIM authentication. Options include sending the email to quarantine or rejecting it entirely.
  6. DMARC provides the receiver with an email address to provide feedback to the sender. 
    Potential feedback can include that the sender’s email was rejected/quarantined by the receiver or that a threat actor is attempting to imitate the sender’s domain.
  7. HOW CAN I ADOPT DMARC ON MY DOMAIN?                                                                                        
    Savvy organizations that adopt DMARC do so in strategic stages, with feedback loops between IT departments and their staff (depending on the size of the organization of course!). Because DMARC can block third parties delivering mail on the purported sender’s behalf, some intended messages may be flagged as illegitimate in some cases - which is a very small price to pay (risk vs. reward) in cybersecurity honestly.
Below Are A Few Steps Organizations Can Take To Ease Into DMARC Over Time:
1. Deploy DKIM & SPF in reporting-only mode first, listing known authorized email servers (such as vendors and trusted internal/external Partners).
2. Collect and review reports to identify unknown email servers.
3. Work with business units and IT staff to identify servers and determine their legitimacy.
4. Update DMARC policy flags to “quarantine” then to “reject” as confidence increases that most or all legitimate
servers have been accounted for.

How To Lock Down Your Computer

How to Quickly Lock Your Windows 11/10 PC


Your privacy matters. That’s why it’s good practice to lock a desktop or laptop whenever you leave it unattended. Use any of the methods below to stop other people from snooping around your PC.

Unlike signing out, locking a computer is faster, just as secure, and doesn’t require you to shut down open programs. You also get to unlock it instantly and pick up where you left off. This article will go through various ways to quickly lock Windows 11 and 10.

Lock Computer via the Start Menu

The most straightforward approach to locking your PC is simply to use the Start menu. Open it, select the User icon or your profile portrait, and choose the option labeled Lock.

Note: If the Lock option is not present, open the Control Panel, go to Hardware and Sound > Power Options > Change what the power buttons do, and activate the box next to Lock to add it.

Lock Computer with a Keyboard Shortcut

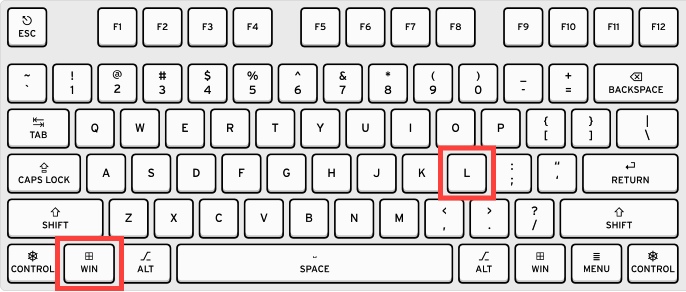
If you prefer keyboard shortcuts, an even faster way to lock a Windows computer is pressing Windows Key + L. Use it a few times, and you’ll get it hard-coded into your muscle memory.

Lock Computer with a Desktop Shortcut

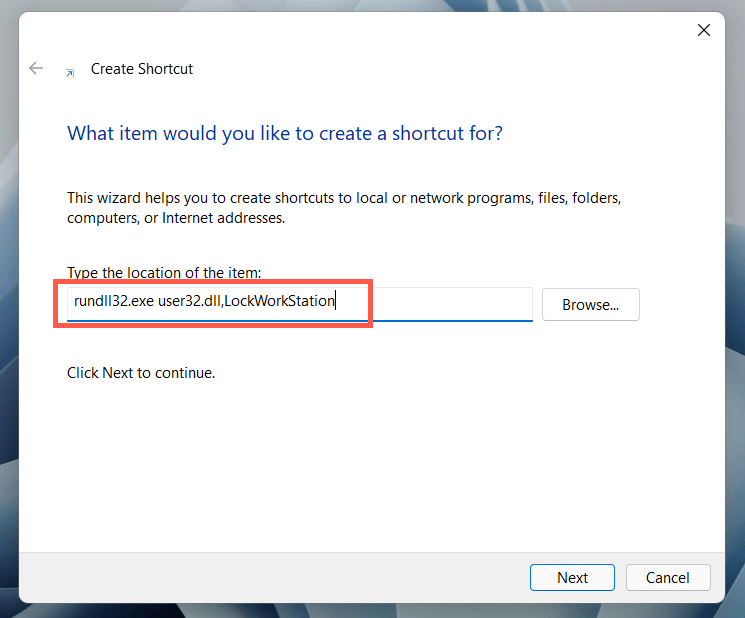
If you find it challenging to use the Win + L keyboard shortcut, you can create a desktop shortcut capable of locking your PC just as quickly.

  1. Right-click a vacant area within the desktop area.
  2. Select New > Shortcut on the context menu.
  3. Copy and paste the following snippet of text into the Create Shortcut window and select Next:

rundll32.exe user32.dll,LockWorkStation

  1. Type a name for the shortcut—e.g., “Lock PC”—and select Finish.
  2. Double-click the shortcut whenever you want to lock your PC.

Lock PC via the Windows Security Screen

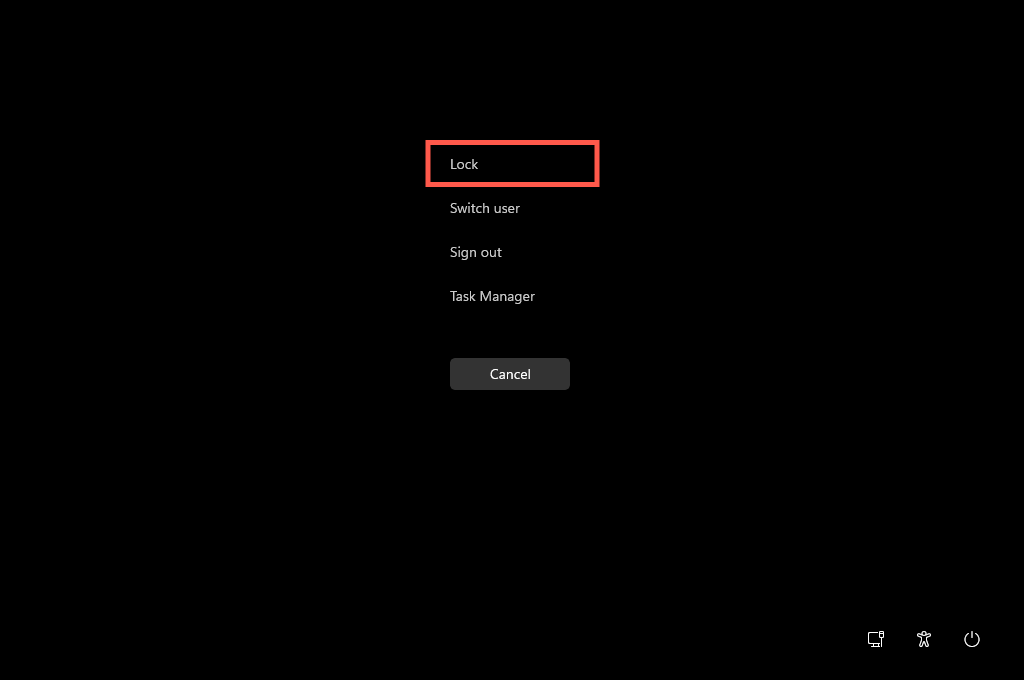
The Windows Security screen (a.k.a. the Ctrl + Alt + Delete screen) offers another quick way to lock Microsoft Windows. The best thing about this method is that you can use it even if Windows 11 or 10 isn’t responsive. Simply press Ctrl + Alt + Del to get the Windows Security screen to show up. Then, select Lock.

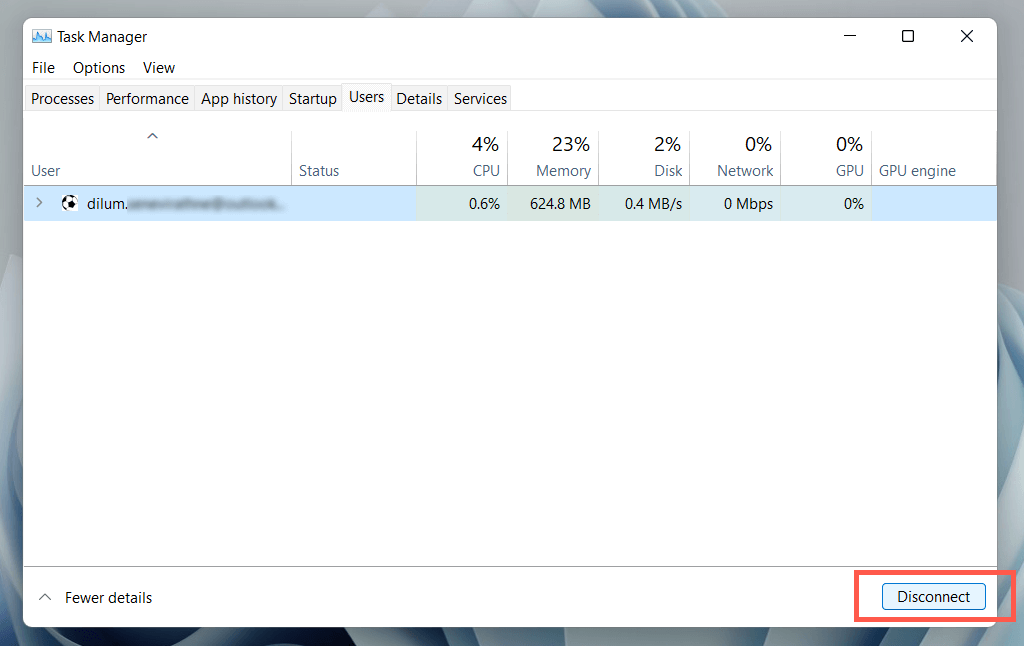
Lock Computer via Task Manager

If you ever find yourself using the Task Manager in Windows 11 or 10 and want to lock down your PC immediately, you can do that using the Task Manager itself.

  1. Right-click the Start button and select Task Manager.
  2. Select More details to expand the default Task Manager view.
  3. Switch to the Users tab.
  4. Select your Windows user account.
  5. Select the Disconnect option at the lower-right corner of the window.

Lock Computer Alongside Screen Saver

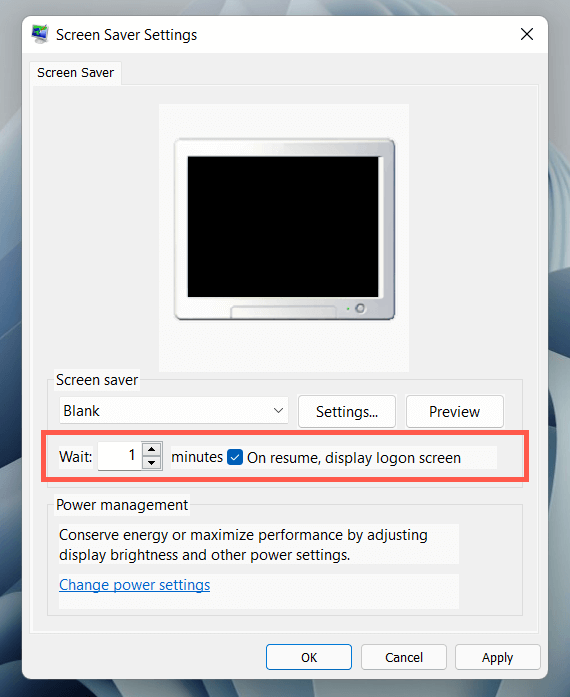
If you regularly forget to lock your PC, you can set up a screensaver to kick in automatically and lock your PC when it engages.

  1. Open the Start menu, search for screen saver, and select Turn Screen Saver On or Off to invoke the Screen Saver Settings pop-up.
  2. Open the drop-down menu under Screen saver and pick a screensaver (select Blank if you prefer to keep the computer screen dark when the screensaver is active).
  3. Specify a time in minutes within the Wait box, check the box next to On resume, display logon screen, and select OK.

Your PC will display the screensaver when left idle for the time duration. Press a key or mouse button whenever you want to exit it and get to the Lock Screen.

Lock Computer With Dynamic Lock

Dynamic Lock automatically locks the operating system if it detects a weak Bluetooth signal between your PC and another device. Although it works with any Bluetooth peripheral, using a smartphone (Android or iPhone) is the most practical.

Connect Smartphone to PC

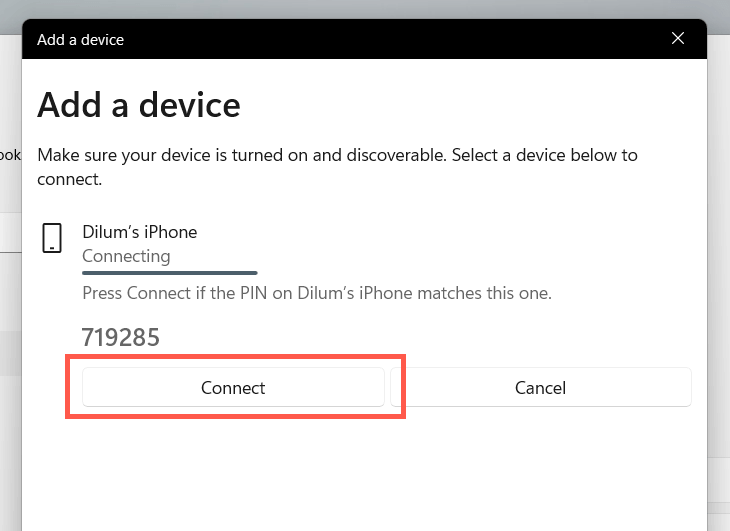
Before activating Dynamic Lock, you must pair your smartphone with your computer.

  1. Put your phone into Bluetooth discovery mode. That’s as simple as visiting its Bluetooth options screen (e.g., Settings > Bluetooth on the iPhone).
  2. Open the Settings app on your PC (press Windows + I).
  3. Select Devices > Bluetooth & other devices.
  4. Select Add Bluetooth or other device > Bluetooth.
  5. Select your phone and go through the onscreen instructions to pair it.

Activate Dynamic Lock

It’s now just a matter of activating Dynamic Lock.

  1. Open the Settings app on your PC.
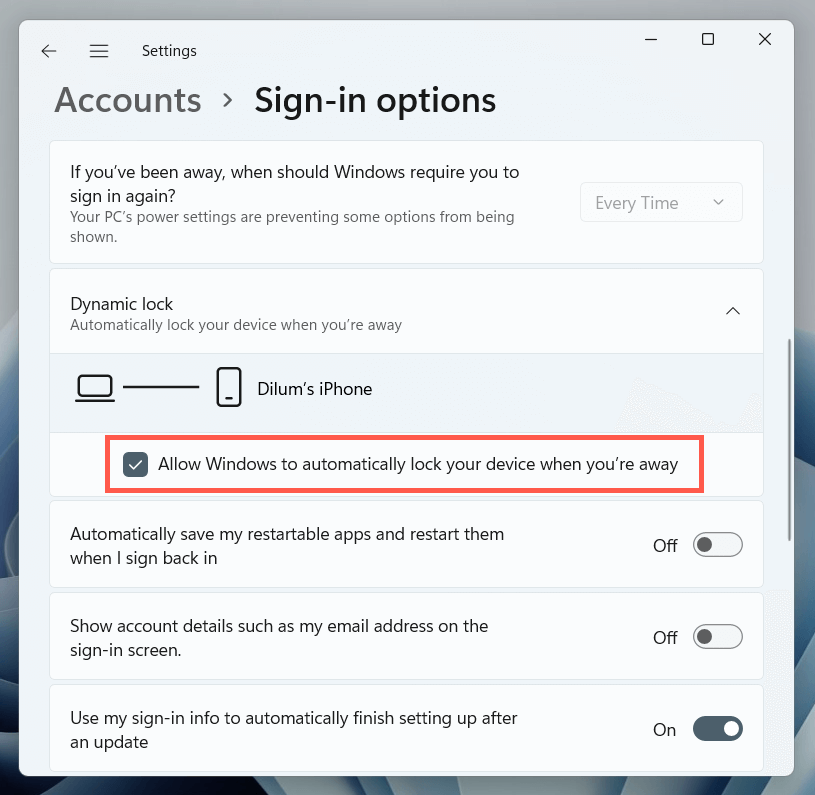
  2. Select Accounts > Sign-in Options and scroll down to the Dynamic Lock section.
  3. Check the box next to Allow Windows to automatically lock your device when you’re away.

Your PC will automatically lock itself whenever you move away from it with your iPhone or Android smartphone.

Lock Computer via Run Command

You can perform many valuable activities with Run commands in Windows, including locking your PC. Although it’s hard to justify using Run over the above methods, it’s good to know that this way exists.

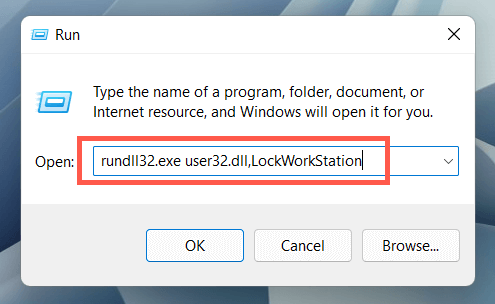
  1. Press Windows Key + R or right-click the Start button and select Run.
  2. Type the following command into the Run dialog box:

rundll32.exe user32.dll,LockWorkStation

  1. Select OK, or press Enter to lock Windows.

Lock Computer via Windows Terminal

Another obscure way to lock a Windows 11/10 PC requires running a command through the Windows Terminal or Windows PowerShell consoles. Here’s how to use it:

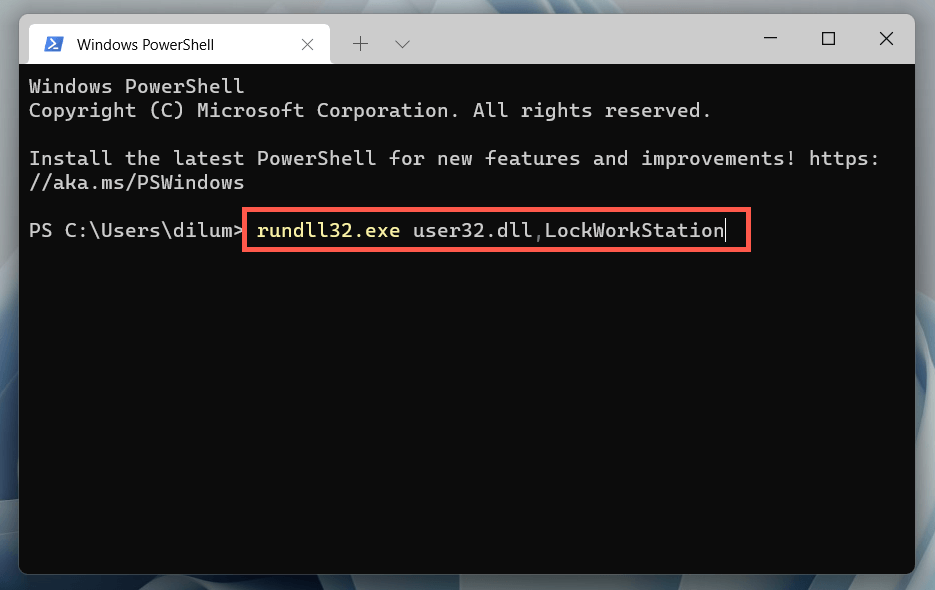
  1. Right-click the Start button and select Windows Terminal (Windows 11) or Windows PowerShell (Windows 10).
  2. Type the following command:

rundll32.exe user32.dll,LockWorkStation

  1. Press Enter.

Tip: The above command also works on the older Command Prompt console. Open the Start menu, type cmd, and select Open to get to it.

While this command is not particularly useful for locking your PC in the moment, it can be handy to include the command in a script so that your PC locks when the script finishes.

Total Lockdown

Locking your Windows PC has no downsides and keeps intruders at bay. It’s easy to forget to do that, however, so it’s always worth taking your time to tweak your screensaver settings or set up Dynamic Lock. While you’re at it, check out how to create a passwordless login in Windows to make getting back in even faster.


All Windows 10 & 11 Users At Risk: SeriousSAM has No Cure Yet!

Microsoft Windows 10 and Windows 11 users are at risk of a new unpatched vulnerability that was recently disclosed publicly.

The vulnerability —  SeriousSAM — allows attackers with low-level permissions to access Windows system files to perform a Pass-the-Hash (and potentially Silver Ticket) attack.

Attackers can exploit this vulnerability to obtain hashed passwords stored in the Security Account Manager (SAM) and Registry, and ultimately run arbitrary code with SYSTEM privileges.

SeriousSAM vulnerability, tracked as CVE-2021-36934, exists in the default configuration of Windows 10 and Windows 11, specifically due to a setting that allows ‘read’ permissions to the built-in user’s group that contains all local users.

As a result, built-in local users have access to read the SAM files and the Registry, where they can also view the hashes. Once the attacker has ‘User’ access, they can use a tool such as Mimikatz to gain access to the Registry or SAM, steal the hashes and convert them to passwords. Invading Domain users that way will give attackers elevated privileges on the network.

Because there is no official patch available yet from Microsoft, the best way to protect your environment from SeriousSAM vulnerability is to implement hardening measures.

Mitigating SeriousSAM

According to Sky Houston, CTO at GeeksByTheHour, there are three optional hardening measures:

  1. Delete all users from the built-in users’ group — this is a good place to start from, but won’t protect you if Administrator credentials are stolen.
  2. Restrict SAM files and Registry permissions — allow access only for Administrators. This will, again, only solve part of the problem, as if an attacker steals Admin credentials, you will still be vulnerable to this vulnerability.
  3. Don’t allow the storage of passwords and credentials for network authentication — By implementing this rule, there will be no hash stored in the SAM or registry, thereby mitigating this vulnerability completely.

When using GPOs for implementation, make sure the following UI Path is Enabled:

Computer Configuration\Policies\Windows Settings\Security Settings\Local Policies\Security Options\Network access: Do not allow storage of passwords and credentials for network authentication

Despite the fact that the last recommendation offers a good solution for SeriousSAM, it may negatively impact your production if not properly tested before it is pushed. When this setting is enabled, applications that use scheduled tasks and need to store users’ hashes locally will fail.

The Best Antivirus for Windows 10 Today (2023) (Is Windows Defender Good Enough?)

The Best Antivirus for Windows Today In 2023: Is Windows Defender Good Enough?


Windows Defender was originally known as Microsoft Security Essentials back in the Windows 7 days when it was offered as a separate download, but now it’s built right into Windows and it’s enabled by default. Many people have been trained to believe that you should always install a third-party antivirus, but that isn’t the best solution for today’s security problems, like ransomware.
If improving Security for your end device is your overall goal and you have a PC (aka Windows-OS device) then you must download and install WINPATROL. There is a FREE limited edition, but if you care for what comes in to your device then for a week's worth of coffee it is HIGHLY SUGGESTED you pay for the Upgrade. I have the paid version on every devices that runs on Windows since Windows 7 came out and it is THE BEST BARGAIN IN PC SECURITY. https://www.bleepingcomputer.com/download/winpatrol/
So, What Is the Best Antivirus Program In 2023?


We definitely recommend you read the entire article so you fully understand why we recommend a combination of Windows Defender and Malwarebytes, but since we know that tons of people will just scroll down and skim, here is our recommendation for how to keep your system secure:
  • Keep the Built-in Windows Defender for traditional antivirus – but today in 2023, malicious hackers require you to adapt and focus on Ransomware, zero-day attacks, keyloggers, and malware (such as Keyloggers that can copy and use every key stroke on your device for their own purposes) that require the 1-2-3 Defense listed below.
  • Use Malwarebytes for Anti-Malware and Anti-Exploit – all of the huge malware outbreaks these days are using zero-day flaws in your browser to install ransomware to take over your PC, and only Malwarebytes provides really excellent protection against this with their unique anti-exploit system. There’s no bloatware and it won’t slow you down.

Editor’s Note: This doesn’t even mention the fact that Malwarebytes, the company, is staffed by some really great people that we really respect. Every time we talk to them, they are excited about the mission of cleaning up the internet. It’s not often that we give an official How-To Geek recommendation, but this is our favorite product by far, and something we use ourselves.

A One-Two-Three Punch Equals a Knockout for anyone trying to cause harm: Registry/Windows Defense (WinPatrol), Antivirus (Windows Defender) and Anti-Malware (MalwareBytes)
1. You need antivirus software on your computer, no matter how “carefully” you browse. Being smart isn’t enough to protect you from threats, and security software can help act as another line of defense.

2. However, antivirus itself is no longer adequate security on its own. We recommend you use a good antivirus program and a good anti-malware program. Together, they will protect you from most of the biggest threats on the internet today: viruses, spyware, ransomware, and even potentially unwanted programs (PUPs)—among many others.

3. So which ones should you use, and do you need to pay money for them? Let’s start with the first part of that unified threesome combo: antivirus.

Is Windows Defender Good Enough On Its Own? NO IT IS NOT!

When you install Windows 10 or Windows 11 (not recommended as of this time), you will have an antivirus program already running. Windows Defender comes built-in to Windows 10, and automatically scans programs you open, downloads new definitions from Windows Update, and provides an interface you can use for in-depth scans. Best of all, it doesn’t slow down your system, and mostly stays out of your way—which we can’t say about most other antivirus programs.

For a short while, Microsoft’s antivirus fell behind the others when it came to comparative antivirus software tests—way behind. It was bad enough that we recommended something else, but it’s since bounced back, and now provides very good protection.

So in short, yes: Windows Defender is good enough (as long as you couple it with a good anti-malware program, as we mentioned above—more on that in a minute).

But Is Windows Defender the Best Antivirus? What About Other Programs?

If you look at that antivirus comparison we linked to above, you’ll notice that Windows Defender, while good, does not get the highest ranks in terms of raw protection scores. So why not use something else?

First, let’s look at those scores. AV-TEST found that it still caught 99.9% of the “widespread and prevalent malware” in April 2017, along with 98.8% percent of the zero-day attacks. Avira, one of AV-TEST’s top rated antivirus programs, has the exact same scores for April—but slightly higher scores in past months, so its overall rating is (for some reason) much higher. But Windows Defender isn’t nearly as crippled as AV-TEST’s 4.5-out-of-6 rating would have you believe.

Furthermore, security is about more than raw protection scores. Other antivirus programs may occasionally do a bit better in monthly tests, but they also come with a lot of bloat, like browser extensions that actually make you less safe, registry cleaners that are terrible and unnecesary, loads of unsafe junkware, and even the ability to track your browsing habits so they can make money. Furthermore, the way they hook themselves into your browser and operating system often causes more problems than it solves. Something that protects you against viruses but opens you up to other vectors of attack is not good security.

Just look at all the extra garbage Avast tries to install alongside its antivirus.
Windows Defender does not do any of these things—it does one thing well, for free, and without getting in your way. Plus, Windows 10 already includes the various other protections introduced in Windows 8, like the SmartScreen filter that should prevent you from downloading and running malware, whatever antivirus you use. Chrome and Firefox, similarly, include Google’s Safe Browsing, which blocks many malware downloads.

If you hate Windows Defender for some reason and want to use another antivirus, you can use Avira. It has a free version that works fairly well, a pro version with a few extra features, and it provides great protection scores and only has the occasional popup ad (but it does have popup ads, which are annoying). The biggest problem is that you need to be sure to uninstall the browser extension it tries to force on you, which makes it hard to recommend to non-technical people.

Antivirus Isn’t Enough: Use Malwarebytes, Too

Antivirus is important, but today, it is far more important that you use a good anti-exploit program to protect your web browser and plug-ins, which are the most targeted by attackers. Malwarebytes is the program we recommend here.

Unlike traditional antivirus programs, Malwarebytes is good at finding “potentially unwanted programs” (PUPs) and other junkware. As of version 3.0, it also contains an anti-exploit feature, which aims to block common exploits in programs, even if they are zero-day attacks that have never seen before—like those nasty Flash zero-day attacks. It also contains anti-ransomware, to block extortion attacks like CryptoLocker. The latest version of Malwarebytes combines these three tools into one easy-to-use package for $40 per year.

Malwarebytes claims to be able to replace your traditional antivirus entirely, but we disagree with this. It uses completely different strategies for protecting you: antivirus will block or quarantine harmful programs that find their way to your computer, while Malwarebytes attempts to stop harmful software from ever reaching your computer in the first place. Since it doesn’t interfere with traditional antivirus programs, we recommend you run both programs for the best protection.

Update: The Premium version of Malwarebytes now registers itself as the system’s security program by default. In other words, it will handle all your anti-malware scanning and Windows Defender won’t run in the background. You can still run both at once if you like. Here’s how: In Malwarebytes, open Settings, click the “Security” tab, and disable the “Always register Malwarebytes in the Windows Security Center” option. With this option disabled, Malwarebytes won’t register itself as the system’s security application and both Malwarebytes and Windows Defender will run at the same time.

Note that you can get some of Malwarebytes’ features for free, but with caveats. For example, the free version of Malwarebytes program will only scan for malware and PUPs on-demand—it won’t scan in the background like the premium version does. In addition, it doesn’t contain the anti-exploit or anti-ransomware features of the premium version.

You can only get all three features in the full $40 version of Malwarebytes, which we recommend. But if you’re willing to forego anti-ransomware and always-on malware scanning, the free versions of Malwarebytes and Anti-Exploit are better than nothing, and you should definitely use them.

There you have it: with a combination of a good antivirus program, Malwarebytes, and some common sense, you’ll be pretty well protected. Just remember that antivirus is only one of the standard computer security practices you should be following. Good digital hygiene isn’t a replacement for antivirus, but it is essential to making sure your antivirus can do its job.

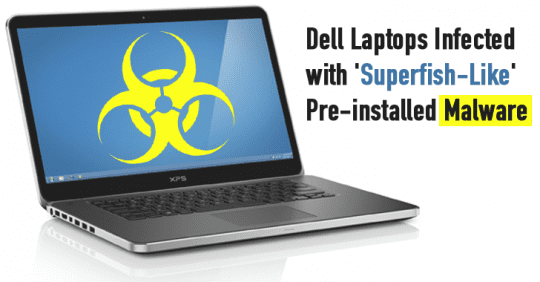
Do You Have A Dell Machine? You Have To Watch This!

‘Millions’ of Dell PCs will grant malware, rogue users admin-level access if asked nicely.

Learn more here!
https://www.theregister.com/2021/05/04/dell_driver_flaw/


Please know this is a serious threat to your computer and data!

We can make sure your drivers are all up to date to help prevent hackers accessing your computer for various reasons, all bad!

Call today to set up a time for us to login to your computer and get to work securing your computer!